Saturday, November 29, 2014

Christmas Stockings from Old Sweaters

 Here is my newest video on YouTube....

I think I really need to add music to these. :-)

I will have to put my son back to work, he can edit these faster than I can.


here are some pics of the stockings after I was done.  

I still have one more to make....or two  :-)


that fur is the softest stuff...I love the look of it.

The white stocking looks like it belongs to Bigfoot....lol  
might have to go back in there and trim his toenails... hee hee


Tuesday, November 18, 2014

Make Your Own Notepads


Items you'll need to complete this project ...

Paper cut into the size you want for the notepad
Aleene's Tacky glue
sponge paint brush

Wood to make your clamp, you can decide the size.
2   5" screws
4   washers
2   bolts


Sunday, November 9, 2014

Re-Covered Mouse Pads

 Here is a video for Recovering an old mouse pad...   

New Projects Coming

Sorry for the delay in new content.  I had to get a full time job due to life changing events and that leaves little time for making new posts or projects.....but....I have one in the "can" as they use to say....  hee hee... and that doesn't mean the toilet....lol

I'm having a little trouble remembering my YouTube password.   I have so many different passwords in my head and then websites make you change them periodically....so I'm at a loss for what that one is at the moment.   Then, I had the video edited and it disappeared....so I may have to start over again. We will see what happens.

I have also lost all my "camera people" due to "Mine Craft"  They are either all playing that (mining diamonds and other things to make square pigs and cows..lol) or they are trying to become YouTube sensations and so they have little time to become Mom's camera person.  So I am back to trying to video tape it myself, which isn't always as easy as it may sound.

And speaking of Mine Craft....does any Adult besides "Captain Sparkles" understand that game...I watch them play it and build these elaborate "worlds" with houses and water falls and hidden rooms....all with a pick ax in hand and I just don't quite get the fascination with it.  I watch them put all these memorized codes in to move here and there and see their frustration as they allow other people to come into "their world" only to be betrayed and have the world totally destroyed.  I don't get the fascination with it.  If somebody I invited here to visit, killed all MY sheep (mind you, I don't have any) I wouldn't invite them back and I think I would stop allowing visitor to come near  my sheep and other livestock and I definitely wouldn't invite them into my home.

Does anyone else have children who are "Mining" and aspiring to be wealthy like "Captain Sparkles"?

Just wondering.

So, on that note, I go back to crafting and say....soon, my friends.  I will have some wonderful creation for you, soon...  :-) 

Until then, you can check out my YouTube channel    my channel My Channel and watch some older videos.  

Also, I want to say thank you to all my readers.  I may not have many subscribers on my blog, but I do have many who follow me on YouTube and I just wanted to say thank you for reading my blog and watching my videos.

Saturday, July 12, 2014

Re-purposed Metal Yard Chair


A friend of mine was getting rid of some chairs and I was heading to the 
dump to make a little extra change so I was thankful to take them.....

I was thinking they were folding chairs    
but, then I saw them....I said...
"I don't think these are going to make it to the dump" hee hee


I had the perfect idea .....

I scrapped some of the chipping paint off and put some 
Rustoleum on them and viola'

I still may do something different with the tile looking back...but
I'm not sure....

The other one is on my patio...so cute!


I borrowed my neighbor's plant to put on there until I got
one of my own.... I love it!  

Thank you Annie for the chairs...much better than taking them to the dump.

Monday, June 23, 2014

"Selfie" Fun Album

We all know how our kids like to take our
phones and cameras and take pictures of themselves....
who doesn't love a "selfie".

I remember as a kid how I loved looking at pictures
of myself.

So, I was looking through some old CD's of pictures last night
and ran across some pretty funny ones of the kids
and thought to myself...wouldn't it be fun to
make a Shutterfly album or one that you make yourself
with some of these silly pictures that they
have taken over the years...

It would help document their interests and what they were
thinking about and their sense of humor while they 
were young.


 this is apparently him practicing his mugshot photos... hee hee

 One of them made this on the "paint" program

 My oldest was fascinated with all my old show wigs that
I wore when singing...I think this was Reba McIntyre


I found a lot of pictures of my son's toys...this was his backpack
ready to spend the night at Grandmas

They took a camera to my moms to document their stay


My son also liked to lay out his clothes the
night before and put his Spiderman pillow in there
for the head.  lol

I had to put one of myself in there.  We found baby squirrels in
the yard and they were very friendly...this one was trying
to climb up my leg...


not sure what is on his head....

this was probably his first great selfie... love it!

Wednesday, June 4, 2014

New Quilt

New Quilt in Progress

I have been wanting to make a quilt to 
take to baseball games, for years...
even started a couple.

One was too pretty to put on the ground 
at games.....so
I gave it to my sister instead
This one started out as miscellaneous
squares in the middle...then I just kept building it out
towards the edge... It also has sections
of fabric from Block Party Studios with 
scripture verses on them.
It was one of my first
"quilt as you go" quilts.

The next one...was sort of a disaster right at the very start.

I bought already cut batik squares at  Walmart.
I thought I would just piece them together and
it would be easy peasy...right?  Nope
Looked horrible no matter what I did....still haven't decided how to 
fix it...


So now I'm on to the next idea...
I have a bunch of squares....all different sizes 
that I've made over the years.  They 
are also all different designs.  Some are paper pieced,
some are disappearing nine patch, plain squares,
and samples of machine embroidery...quite a 
mishmash 

I've decided to put them all together in the same quilt,
even though they are nothing alike.  What else am I 
going to do with them?  right?  


So I'm building this quilt in horizontal strips...
and then I will probably quilt as you go.
I don't know what I will do when I run out of squares....
I guess just start making borders.

check out the progress so far

I think it's going to be interesting....
to say the least....

I'll keep you posted on the progress...


Friday, May 30, 2014

Unique "Suitcase" End Table

A friend of mine posted some pics of a purchase that she
had just made...of an old suitcase.

As soon as I saw it, I knew what I would do with it.

I would make a table!!


Since this isn't actually my suitcase, I can't show 
you what I would do...so I'll tell you ;-)
I think I would start by covering all the hardware with tape
and then spray painting it with
whatever color would look good with the handle...
Maybe a little darker color blue.

Or leave it like it is...


If you wanted to, you could recover the inside...if it was something
that you thought you would store things in.
I'm sure Joann's has some cute fabric.

I would then cut a piece of wood a little smaller than the
bottom of the suitcase and would attach some
cute legs to it, and attach the wood piece to the bottom of the suitcase!

I've seen many different versions of this...so it's all up
to your imagination!


and now I'm on my way to the thrift stores to see what I can find 

Thursday, May 29, 2014

Another Fairy Garden

Yet another version of a fairy Garden 
from our local greenhouse
Village Green

check out their website above for more pictures of
their wonderful gardens....under the tab "garden"

sorry these are a tad blurry....they were taken with my phone...which is not "smart"  lol


I think I may move some of my things to a potted fairy garden...
These are the same blue stones that I got for mine....they weren't such a good idea for outside....because when it rains....they tend to go places.... ;-)  
I was just thinking that the other alternative would be to
make a creek bed....my manufacturing it in some way and gluing
the rocks to it and then putting it in the garden....that way they would stay put...

they sell all the little plants to go in your pot...so many fun things to put in there...
I love little things...


 I love the little house made out of wood....

Monday, May 12, 2014

Taking Great Pictures

We have a wonderfully talented friend who has a special talent for taking pictures and for teaching others how to do the same....I asked her if she would share some of the info that is on her blog and she said yes....so....welcome my guest blogger 
Carolyn.  


What Makes a Great Photograph

Let’s be real. Anyone can take pictures these days. Everyone has a cell phone, a point and shoot, or a fancy DSLR. That’s why it’s so hard to break out into photography…because everyone can be a photographer. Do you wonder how the photographers that have successful businesses make it past the “everyone can do it” to “people are coming to me so I can do it for them?” Well they have talent, they’re very business savvy, but they also know The Secret. Instead of setting their camera on auto and shooting aimlessly, they know the secrets to what makes a great photograph.

Composition:
As a building needs a strong foundation, so does a picture. You need a good composition that will grab the viewer’s eye from afar. Does your picture have interesting shapes? Lines? Contrast? Take for instance the picture below. Your eye is drawn to the contrast of the yellow leaf against the gray background. The line of the stick leads you right into the picture. Once you are drawn in, you then notice the other details. Like perhaps the small water droplet at the tip of the leaf.


Perspective: If you use the same perspective in every picture you take, every picture you take is going to have the same perspective. Well, duh! What I’m saying is- if you want to have new and exciting pictures every time…you have to change it up. Shoot above your subject, below them, to the side. Make your subject switch positions. I know some people take 5 pictures of the same pose. Don’t do that! Every time you hear the shutter click, switch up your position. You may be getting an awesome picture you wouldn’t have gotten otherwise. 


First picture I’m crouching down with my subject.  


 Second picture I’m standing on top of my fiance’s shoulders! Oh the possibilites…(and the things you’ll find to use!) 


Framing:A subject standing against a plain background can be a very effective picture, but sometimes you’re looking for that extra spark. Sometimes your picture just needs that special something. Framing is using shapes and lines that draw your viewer to your subject. Here I used the four windows to frame our guitar player.


Here you have the doorway to bring your eyes right in to this charming senior.


There you have it. The Secrets. Not so much a secret because us photographers don’t like to share…but more a secret because not many photographers know. When you look at a picture and decide whether you like it or not, I can guarantee it has something to do with these 3 tips. If you find you’re stuck in a rut and aren’t getting the results you want…don’t go out and buy tons of expensive gear. Go back and learn the basic of a photo. This will help you learn what makes a great photo, and help you to re create it. Now these are just my 3 ideas…what are yours?

Happy shooting,
Carolyn

Check out Carolyn's Blog or

visit Carolyn on Facebook


Thursday, May 8, 2014

Painted Refrigerator

Well...I was looking at my refrigerator and thinking..
how ugly it was and why not 
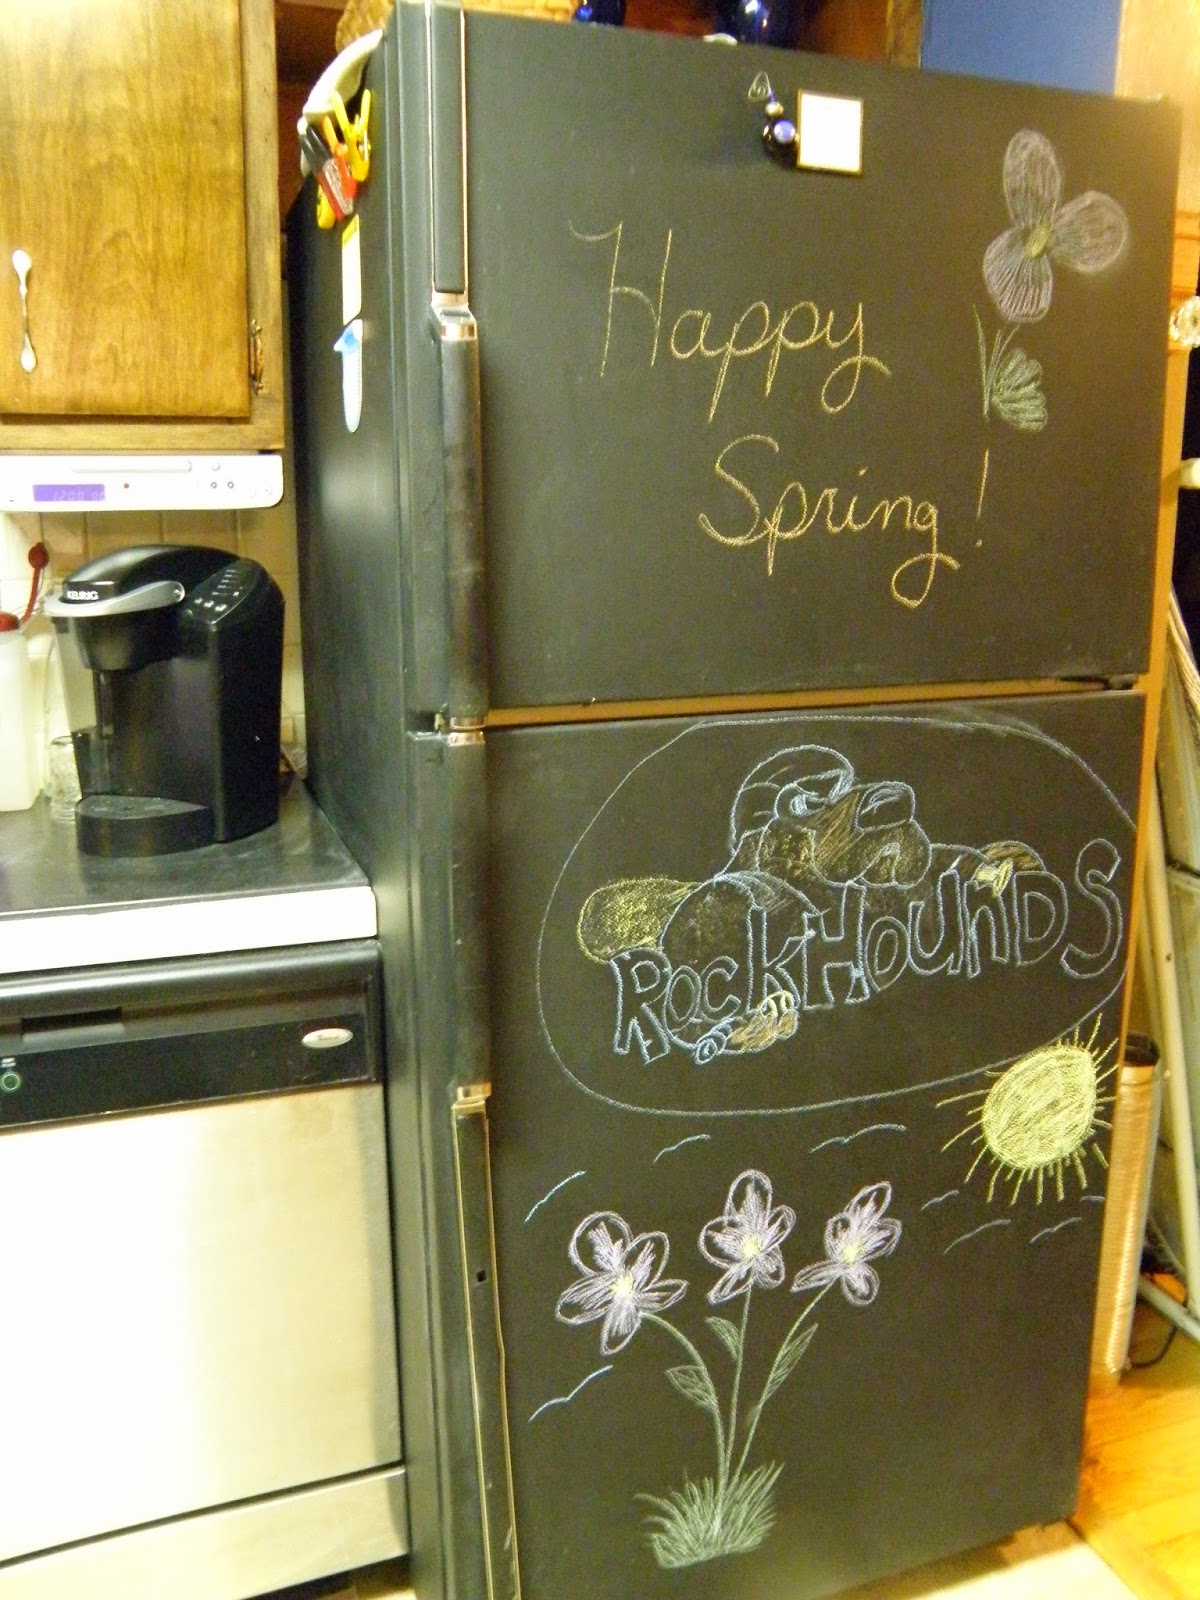
paint it black with chalkboard paint...
so here is the adventure...

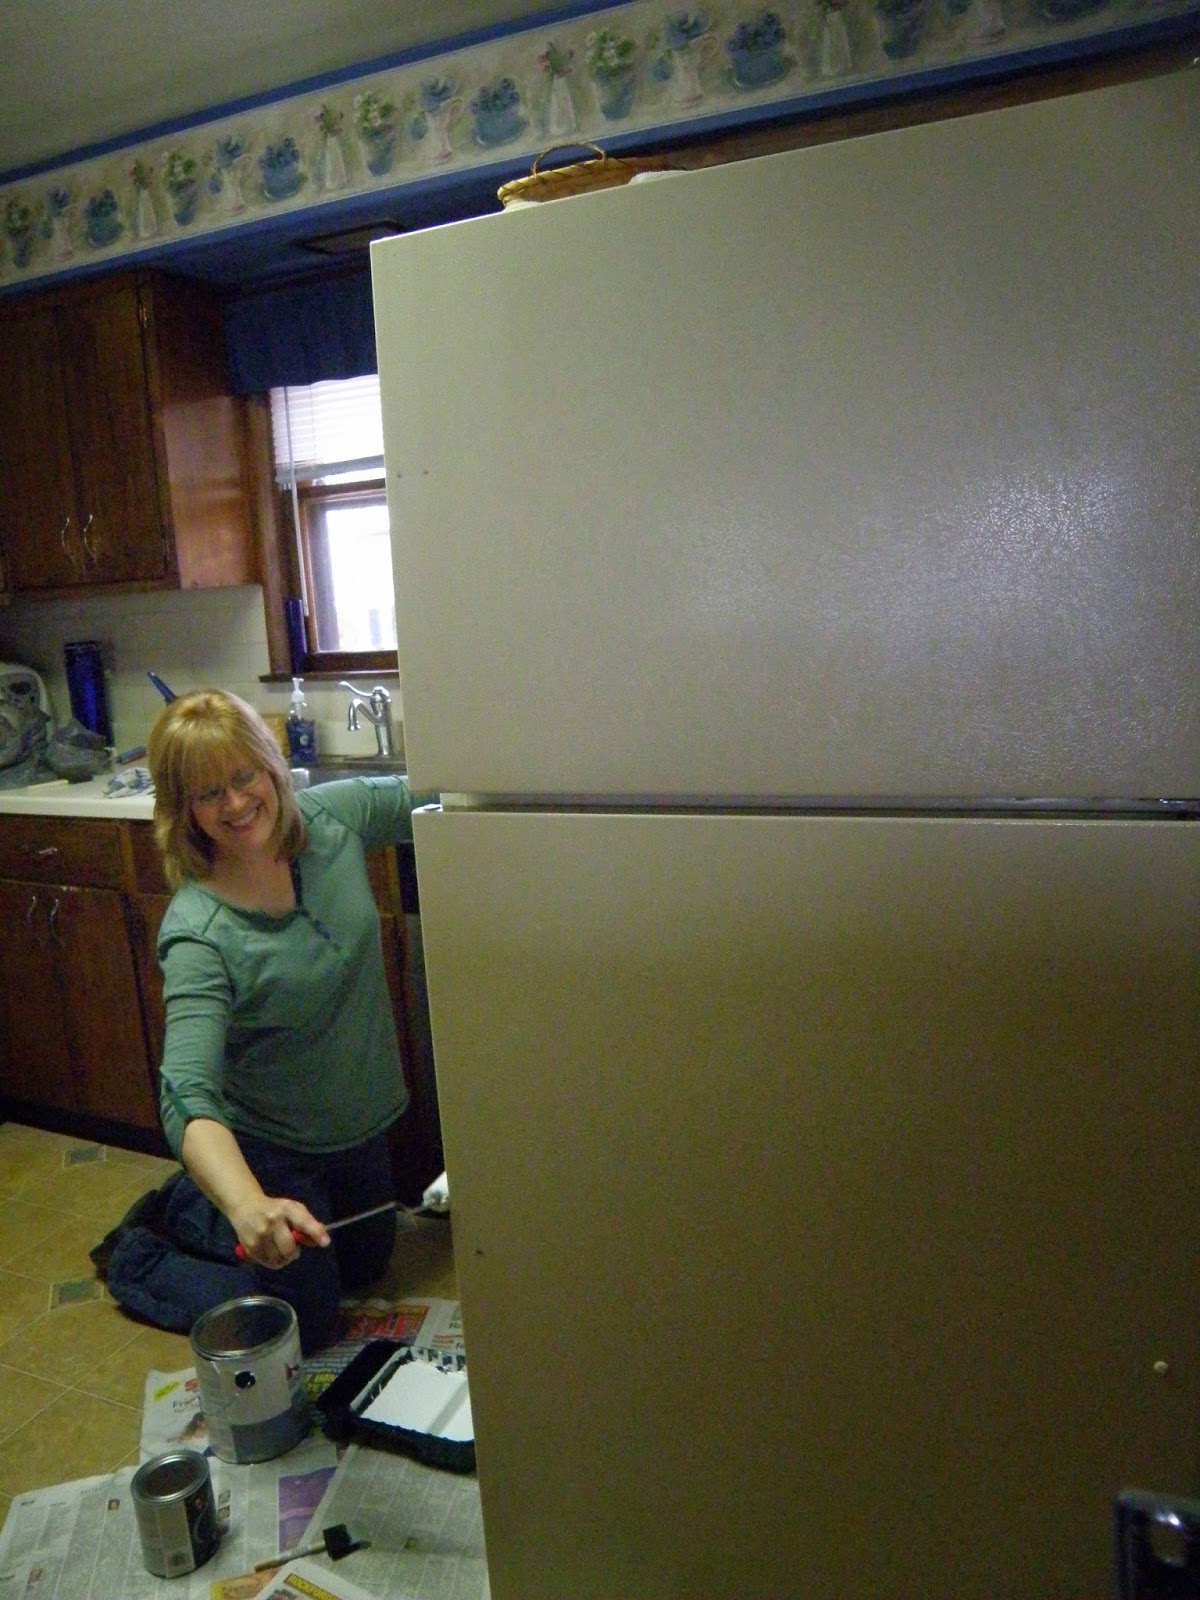
This is the frig before....ugly almond ...that didn't
really go with the kitchen at all...you
know...90's  almond... yuck!

So we started out by using a regular primer on the whole refrigerator....

and then applied the chalkboard paint...it was
the Disney brand.

We let it cure for 7 days before priming it with chalk,
which is basically, lightly rubbing the chalk on the fridge
on its side and covering the whole surface and then
wiping it off....then it is ready to 
accept the chalk without staining it...


To clean...just use water on a soft sponge and wipe clean...

I think it looks so much better in our kitchen with our stainless appliances
and darker cabinets...much better than
Almond.


Saturday, May 3, 2014

Another Fairy Garden update

A new obsession...is trying to find really tiny things....
cheap....


I got the rocks and the lady at the dollar store...also the Styrofoam moss covered 
rocks were from 4/pk

I still have some work to do and may line the whole thing differently...
I guess these are meant to be in a container...not actually in a garden...
a container would be much easier to weed and I know the local
greenhouse had lots of little plants for $4 a pot.

I bought the blue glass pieces at the garden store for 
a reasonable price.  I think I need some more... :-)  
 I want to pick these all out (sounds nuts) and line it with something so they 
don't sink down in the dirt.

Friday, May 2, 2014

Fairy Garden Update


As soon as it decides to be spring again outside
I will take some more pics of the additions I added 
to the fairy Garden...

I got a little garden lady I put in there and something else...
can't remember what it was.

But right now it is cold and rainy and even some 
snow in the air yesterday.

For those in the Rockford Area there is a
Fairy Garden Make and Take event
happening at Pepper Creek this weekend...
Looks like fun!


until then....we have been enjoying indoor activities like the discount day and 
butterfly exhibit at
I got a "ride along" Cabbage butterfly for a while,
which was fun...although
I was afraid he was going to get smashed with my purse... hee hee

Saturday, April 26, 2014

Fairy Garden

I remember the first time I heard the phrase "fairy garden" ....

My sister used it last spring and I had no idea what she was talking about.

Now this spring I see all these little things to put in your fairy garden and
now I'm hooked...

So here are some of the pictures so far of my little Garden...I'm just missing
the fairy


I have a cup in there that got broken in the mail and
I couldn't stand to throw it away, it was such
a neat pattern

This was an already established bed of hens and chicks
which I just added some more things to.


Can't wait to build a house for the fairy......it
is hard to see the little trellis.


Thursday, April 17, 2014

Decoupage Night Stand


This is my daughter's nightstand that we had purchased at a 
garage sale years ago.  

It was a darker brown wood...she painted it white and used
scrapbook paper and her own printed pictures that she made
from online text and tore them and glued 
them onto the top.  

Just using white glue

I wanted to get a good thick clear coat on the top...but didn't make it before
she got a piece wet and it tore.  Easily fixed...just haven't done
it yet.


She also did the drawer front.

As you can tell she is into Paris things and music...

This turned out so cute....it is so much nicer in person.


Monday, April 14, 2014

Necklace and Bracelet Set

Special yarn necklace and bracelet


My new necklace and Bracelet Set from AllAmericannCreations

it is so light and airy you don't even know it's there...I love it.
Thank you to my friend Ann for This pretty Set.

Monday, January 27, 2014

Bridal Shower Invitations


Bridal Shower Invitation


I got the file for the Cricut from an SVG file site
I have Sure Cuts alot for my computer.

which is awesome by the way....no buying tons of Cricut cartridges
it's about $70 for the program...but it's a one time thing and 
lets you use hundreds if not thousands of free svg files on the web and even
gives you the ability to make your own.

 Wedding dress download from free svg files


It comes in three pieces.  I only used two pieces.  The full front piece and then the half
back piece, which is just the skirt.  I also embossed the top with the Cuttlebug.  

I then glued the back piece to the front and then embellished the front with ribbon, rhinestones and 
sparkly tulle.

Please Leave a comment and let me know what you think.

Monday, January 20, 2014

Re-purposing a Stool

From Broken Stool.....to .....Night Stand

This thing was wobbly and legs wouldn't stay attached to the 
metal frame and the back completely fell off...so
before I threw it on the curb....I thought
we'd try making a night stand out of it.

we had searched high and low at all the thrift stores but
couldn't find a night stand....so this will do for now...

I still have some adjustments to make...but I
don't have any good tools...I just did this
with a hand saw...think I need to take a little more
off the front leg....but I'm afraid to... hee hee
pretty soon when you start doing that...you end up
with no legs on the thing...


Friday, January 17, 2014

Painting

If I can do it....you can do it...


I have always loved trees and had this idea in my head for a while...
My kids and I have been on a new journey in life...
and I wanted to represent the 4 of us going on into a new day.
The sun is setting on the past, but it is also going to rise
on our new future and by the looks of the sky....the next
day is going to be beautiful!

I am a painter by no means....I have always loved to
try.


I used acrylic paints and an extender so that they don't dry
too quickly.  It makes them act like oil paints. Just make sure you completely
cover the canvas with gesso first (white) it kind of primes the canvas
and gets it ready to accept the paint.

Wednesday, January 8, 2014

Can you guess what it is?

Does Anyone have a guess?


It all started when I was trying to make something 
else and it went wrong....sooo
I decided to make it into something else.

This was done with a hole saw attached to my drill...it was
just a scrap piece of wood....so ignore the other screw hole...that was from another project... 


Wait for it!!!!


Yes, it is a curling iron holder....
I first had it attached to the wall...(which is a better place) but then I moved furniture around and decided to bite the bullet and attach it to the dresser side....I wish I would have put it lower....but oh well...

As you can see....I haven't painted it yet...