Showing posts with label crafts. Show all posts

Friday, June 22, 2018

Little Things

Little Things
Simple little things give me the biggest joy sometimes....
It doesn't have to be expensive or too shiny to make my heart bubble up a little.


 One of my favorite things.  

Earlier this spring I purchased a house and I had a lot
of fixing up to do. 
When the weather got nicer, I wanted
to make a little place on my screened in porch to 
relax and watch the 
trees blow, the rabbits play and watch the hummingbirds feed.
I found a little table at the thrift store and painted it a "beachy" 
kind of blue and found some already whitewashed 
baskets and shells from the dollar store.
to add a little bit of magic to my night time visits to my new "special place"
I took out one of my wide mouth mason jars and added a little string
of micro lights to it...purchased at Walmart

it gives the impression of Fireflies in a jar.


Monday, October 24, 2016

Handmade Oven Mitt


Handmade Oven Mitt.....

Don't burn your hands anymore!!!! 


What you'll need:

Scissors
Fabric 
(two different Patterns)
Pins
Insul-Bright 
(heat resistant felt)

Sewing Machine


Sunday, November 9, 2014

New Projects Coming

Sorry for the delay in new content.  I had to get a full time job due to life changing events and that leaves little time for making new posts or projects.....but....I have one in the "can" as they use to say....  hee hee... and that doesn't mean the toilet....lol

I'm having a little trouble remembering my YouTube password.   I have so many different passwords in my head and then websites make you change them periodically....so I'm at a loss for what that one is at the moment.   Then, I had the video edited and it disappeared....so I may have to start over again. We will see what happens.

I have also lost all my "camera people" due to "Mine Craft"  They are either all playing that (mining diamonds and other things to make square pigs and cows..lol) or they are trying to become YouTube sensations and so they have little time to become Mom's camera person.  So I am back to trying to video tape it myself, which isn't always as easy as it may sound.

And speaking of Mine Craft....does any Adult besides "Captain Sparkles" understand that game...I watch them play it and build these elaborate "worlds" with houses and water falls and hidden rooms....all with a pick ax in hand and I just don't quite get the fascination with it.  I watch them put all these memorized codes in to move here and there and see their frustration as they allow other people to come into "their world" only to be betrayed and have the world totally destroyed.  I don't get the fascination with it.  If somebody I invited here to visit, killed all MY sheep (mind you, I don't have any) I wouldn't invite them back and I think I would stop allowing visitor to come near  my sheep and other livestock and I definitely wouldn't invite them into my home.

Does anyone else have children who are "Mining" and aspiring to be wealthy like "Captain Sparkles"?

Just wondering.

So, on that note, I go back to crafting and say....soon, my friends.  I will have some wonderful creation for you, soon...  :-) 

Until then, you can check out my YouTube channel    my channel My Channel and watch some older videos.  

Also, I want to say thank you to all my readers.  I may not have many subscribers on my blog, but I do have many who follow me on YouTube and I just wanted to say thank you for reading my blog and watching my videos.

Sunday, November 25, 2012

Handmade Ornaments


 A Little Christmas Nostalgia


So, doesn't everybody want a little nostalgia at Christmas time.  I love looking at the the ornaments that either people have made or bought for me.  But the best ones of all are the ornaments that I have that I had from when I was a kid.  The one above was made out of a Jet Dry dishwasher detergent cup from the early 70's.  This just goes to show you that you can make an ornament out of just about anything.  All my brother had me do is wrap it in aluminum foil and put some metallic snowflake stickers on it.  Another one has a picture from an old Christmas card in it.
Sorry for the blur

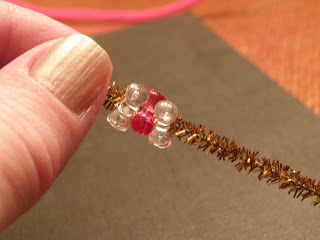
So, this is another ornament that I made with my kids when they were smaller and it's a great way to keep them busy.  You could have them give them away to grandparents or aunts and uncles or maybe even have them decorate their own small tree.


All you need is some pipe cleaners...White usually works the best but you can use whatever color
you want.  You also need some of these beads...they are called "tri-beads"  I use the transparent ones..I think they looks nicer and they nest together...All you do is have them thread them onto a pipe cleaner and then shape it into whatever shape you want.  Either a wreath or candy cane or whatever.


Be Creative and have fun!!  :-)


Monday, April 23, 2012

Burnt Glass

What happens when you burn an old door with glass panels in it? Well, the door disappears. The glass explodes in the heat and all that remains are the metal hinges. How do I know this you ask....no, I'm not a fireman.. ;-)

We had some old doors sitting on the side of our house for about 6 months last year. In the fall my husband was cleaning the yard up and started a fire to burn some of this unsightly clutter. It was an interesting day to say the least, as we watched the fire grow and grow. We had two or three doors that we burned that day and one of those was the old front door.

O.K., so fast forward now to all the warm, summer like weather we had in March. I decided to clean out the fire pit to get ready for our recreational fires this year. Low and behold what do you think I found in the ashes....but pieces of melted, twisted glass. It looked really neat. I decided to save it and announced to my seventeen year old daughter that I needed to come up with some crafty thing to do with that glass.

She saw something on Pinterest that ignited her creativity and asked if she could use some of the glass....I said "sure". I was thinking...have at it, let's see what you come up with. (whew!, one less thing my brain has to do this week. :-)

I think it looks pretty neat. We are planning to put a hook in their ceiling to hang it on. It sounds pretty too.

Now, I wouldn't suggest making a fire and burning glass jars or anything, but I think the crafts stores sell pieces of glass for mosaics that you could wire wrap and have the same effect or have your husband drill small holes in them to put heavy string through. (or you if you're handy with a drill ) I also wouldn't suggest hanging this anywhere where it's going to get whipped around hard....it IS glass after all and we don't want little broken pieces all over your floor. OUCH! :-0


She used an embroidery hoop and painted it, wire wrapped around the glass and wrapped around the hoop.  Also she cut out pieces of fun scrapbook paper and attached that with beaded strands.  The scrapbook paper will be a good wind catcher.


This project reminds me of when I was little. I lived in NY state and we use to have family get togethers at Bear Lake. My grandfather had a cottage there. I loved that place....it was musty smelling but had the neatest things in there. Grandpa had round wicker chairs and old wooden trunks, but most of all he had wind chimes that were made from pieces of painted glass. I remember that they were rectangular pieces painted with polka dots and some with stripes. I would often get sleepy after a long day of playing on the beach and eating good food. I would sit in the living room area and watch those wind chimes and listen to them tinkle as the wind got a hold of them. It was so peaceful. What a wonderful memory.

Thursday, April 19, 2012

busy-ness

This week has been so busy for us. I tried to get a project going and it didn't go well and we have play rehearsals and so many things happening...I am so hoping to get the water bottle carrier up this weekend. I made one a year ago but have some revisions that I would like to make. So hopefully tomorrow or Saturday....we'll see how it goes. :-)

Although I forgot my daughter is working on a cool project that I might post tomorrow...hm???

Thursday, April 12, 2012

Necklace Re-Make - #2


Remember these little beauties... ;-) well I redid the coral colored one. I'm not sure if it counts since I didn't
put any of the coral color back in it. I purchased some other flat, round, shell beads to put in instead. I think I like it. It looks good with this shirt, but I think I need a longer one to go with the shirt that I wanted and I still want to make one that incorporates the coral color beads.


This one got a bit short since I did use the same piece of wire. I just cut the end of it to release the old beads, restrung it and then put a new end on like I showed you before. So, it got a bit short on me.

Now to figure out a necklace to make with those coral beads....hmmm back to the drawing board. :-)


Tuesday, April 10, 2012

Computer Crash! EEKS!


Well this week included a computer crash along with all the normal excitement of the week...so, now that we're slowly trying to get everything up and running again, I need to get back to work crafting.

I'm in the process of doing a video about a lovely little lampshade...we'll see how that goes.


I hope everyone is having a good start to their week.


Here is a little pic of a card design that I did to tide you over. hee hee...


Made with the Cuddle Bug by Provo Craft to emboss the white piece of paper and just some fancy edged scissors to do the edge of the white. The same scissors were used for the blue strip and then I hand wrote with a gel pen on the blue and cut out a paper heart to glue on. :-)


Happy Crafting!


Thursday, April 5, 2012

Necklace Re-Do


Well here is the video of re-making my necklace I made from last September.


Let me just say...a photographer I am Not! :-)

Wednesday, April 4, 2012

Projects in the Re-Mix


These are just a couple of the projects that I'm going to re-do. I'm not sure that I liked the way they turned out. I think the coral and white one has too much coral color and the multi color one needs another strand....what do you think?


I made this little pendant to go in the middle...I might keep that part. (I have no idea
why this is underlining this, since it isn't even an option....I mus have pushed some unknown button....oops!)


Thursday, March 22, 2012

Making Paper Beads


Years ago my mom brought me a necklace from one of her trips through the mid-western United States and it was made out of church bulletins. I was fascinated by that necklace and years after that decided to check into how to make paper beads myself.

I decided to share that with you today. It is a bit time consuming, but fun and can be rolled up while you're watching t.v. or something....some people might consider it relaxing.

It is fun to see how the beads look after they're made opposed to how the paper looked in the beginning. You can also use 12" long triangles and thicker paper to make bigger beads.

Check out of the video tutorial LINK below.


Sorry about the length...I'm learning that I'm a little long winded....I actually edited a version down that I will try to put in place of this one soon. :-) ta da....I figured out how to get the edited version up....I'm learning soooo much... heehee


Here are some close up pictures to give you a better view of some of the aspects of making these little beauties. :-)

Here is the start of the rolling...

try to make sure that you keep the paper going down the middle...and keep good tension on it.

use a dab of the glue mixture on it to get it the end to stick and then give the rest of the bead a thin coat.

Something else that I forgot to mention....The longer your paper is the fatter your bead will be. Mine are pretty skinny, so if you used the whole 12" length of paper they would be fatter. Try one or two before you cut a ton of them.


So, go get some cool looking scrapbook paper and see what you can do it.....

you will do GREAT! :-)


Monday, March 19, 2012

T-Shirt Quilt


I have a tradition going, (which sometimes I wonder why I do such things to myself) that when the kids turned two, I made them a quilt and when they turn 12 they get a new quilt. Well a twelve year olds quilt is due in August..... it's the last quilt I'll be making for twelve year olds.

This one is going to be my son's and I was really stumped as to what design to go with. He loves baseball and I was looking for some fabric or something to make it look like a baseball theme, when I ran across t-shirt quilts and thought "that is perfect". I thought he had a lot of t-shirts, that is until I started this project and then ended up running to thrift stores looking for more
t-shirts.
But I think it's going to turn out cute if I can ever get it done. I'll post a pic of the finished project hopefully in the next few months.

So you start with old or "new to you" t-shirts. :-)


Then cut the front of the shirt off of the back and lay the back aside, you may need it later. :-) (that is what I use for the bordering strips.


Then Iron some fusible interfacing/stabilizer on the back so that it doesn't stretch and it's easier to sew.

You then decide how big you need your squares to be, based on the design on the front of the shirt. I tried to look at all the shirts I had and the designs on them and tried to cut them all to the same size if possible. Some shirts were smaller and needed strips added to them so then I decided to cut the squares so that they would all have some sort of border or strip piece around them. :-/ ayy ye yei!

Then you start making sections of strips and squares. I decided half way through :-/ that maybe I should have just made strips that were sewn to the quilt,....I am doing quilt as you go for this quilt, so when I get the top strip pieced I put the batting, and backing on and quilt it and then sew it to the main section of the quilt.... (are you confused yet?)

See the top row doesn't have all the squares yet, or isn't the right length, I'm still working on trying to put a piece in there that will fit. It really makes it hard when the squares are not all the same and the strips are not all the same....I will know better next time, if there is a next time. hee hee


In the picture below I wanted you to see the piecing close up and the quilting that was done on some of the strips. This is definitely an experiment, but it's been fun collecting the shirts and seeing his excitement as it progresses. He loves seeing all the different shirts that I've found.


So if you attempt one of these, good luck. They are really fun, but it's good to have a base plan...Stick with the same size squares and decide whether you are going to put strips between or not. I love the look of quilts that have that piecing in between but have never attempted one before now....And I'm "free-styling" which can
be a good thing or a bad thing. :-)

Have a great week, God bless!

Tuesday, March 13, 2012

Crafts That Go Awry!

All Hail the Dog Prince!


You know how every once in a while you have a craft that doesn't turn out just quite how you expected.


That is what happened to my daughter....she was trying to make a bag for herself and it wasn't looking quite right. I kept telling her that I thought it looked like a crown and the next thing I knew she tied it off and crocheted a strap and put it on the dog. And doesn't he look grand!

So you know, sometimes it doesn't always turn out perfect but we can always try again. :-)


Sunday, March 11, 2012

Dressing Screen


My two teenage daughters have been sharing a room for a while now and they seem to have had a problem with locking each other out of the room because they were getting dressed. I got tired of hearing the complaining that sounded something like this... "Mom, she locked me out of our room!" So I asked my dear hubby on Saturday if he thought he could make one somehow. I had some of my own ideas but the mechanics of it all was beyond me. And the arthritis in my hands and wrists keep me from doing anything that takes too much strength.

So he had an idea how to make it out of pvc pipe and here it is. Once he got the main frame done, the girls and I went to the store to pick out fabric and I started trying to figure out how to fit it on there.


Well it is done. And he made it so that it folds up out of the way. I hope this ends the arguing over the door being locked. :-)

Thursday, March 8, 2012

Magnetic Picture Holder

Check out this new magnetic picture page for the refrigerator. Not bad for free...all stuff I had around the house. If you don't want to spend the money on a self adhesive magnetic sheet, just use old advertising magnets and glue them on the back. You may even know someone that could spare a page protector so you wouldn't have to buy those. The embossed metal accents you see are just foil stickers from the dollar store they came all connected. I cut them apart to make four "stamps". I wanted to keep it simple since I have a lot going on up on the fridge as it is. :-)


Wednesday, February 29, 2012

Clothesline Basket


I love these baskets and wish I had the time to make more. In all actuality all I'd have to do is cut the fabric sometime and then when I'm sitting watching television I'd have something to keep my hands busy. I could be wrapping the clothesline with the fabric and then when time permits again, that would be the time to sit down at the sewing machine. If you have an afternoon to give to a project like this, it is well worth it. It looks complicated but it really is pretty easy. It is like creating pottery with fabric. I love it!

You have to buy the book "Wrap it up" by Susan Breier. It is an awesome book. There are purse patterns in there that are awesome. Give it a whirl. All you need is the book, a sewing machine that can do a zig zag stitch, thread, clothesline and fabric.

Saturday, February 25, 2012

New Card Design....sooo pretty!


I love making cards for people. It is so fun to put colors and different stamps and elements together to create a one of a kind creation or something that you can create a lot of to send out to many people. What makes it even more exciting for me is when I can create a card or set of cards for very little money.

Also, for me it is all about saving money. I go into sticker shock every time I see the price on the back of a "nice" store bought card...it's like a horror movie... :-)
And look what pretty little things you can make for hardly nothing at all.


This card was created from a pack of paper that I got at the "super dollar" store for $1.59. I also purchased the little flower accent (which was actually a whole sheet of different sizes and colors) for just $1. I usually buy a pack of card stock from walmart for about $4 or less, a glue stick, paper cutter (nice but not necessary) and a Happy Birthday stamp from the $1 bin at Michaels. How can you go wrong with that.


You could actually make many different cards with just those few items. I know so far I have made at least 10-12 cards from that size pack of paper and there is still plenty left. Maybe I'll post some of those later to show you. :-)

Tuesday, February 21, 2012

What's in YOUR Pocket?


So....I was downstairs digging around in my fabric bins and came across a project that I've been meaning to take advantage of and never did. (like that's never happened before) I found 6 back pockets from old jeans that I was meaning to use for napkin and silverware holders. You know, like a different twist on a napkin ring.

I think it would be really fun if you had red and white checked placemats. I think they still look cute even without the red and white checks. I think they are fun the way they are and the kids sure get a kick out of them.....but how cool would they be to have sparkly things on them or ribbon or flowers. I can't do that with the boys using them, that wouldn't be "cool"
:-/ .....although it gives me an idea that maybe I could make a set just for us girls when we have tea parties.......we could "girlie" them up a bit......hmmmm???


Monday, February 20, 2012

One...two...tie my shoe?

I was thinking of this cute little pair of pink tennis shoes that my oldest daughter had when she was approximately two years old.

She looked so cute in them. When she outgrew them I decided to try my luck at making a little activity book with them. Actually I only used one shoe and I use the other one to decorate for Valentine's Day or for summer.


This was my first attempt at making a book....back in the day. Mind you that I didn't have a very good sewing machine and had never done one before and didn't even have a pattern. It was all in my head. This book is looking a little rough, but it is almost 16 years old. It gives you an idea of what it could look like. I remember that she loved this little book. I traced her hand for the 1..2..3 page. The grass on the cover, under the tree has velcro on it so she could take it on and off. She had to button the clowns coat and his clothes were made from an outfit of hers.


I made two large rectangles for each section....the full width of the two pages. I put any embellishments on that I was going to do, before I sewed them together. If you have a fancy machine, you could actually embroider the words on there or you could print it out on the computer on fabric/paper sheets and fusible web them on. I didn't know about any of that stuff back then and just wrote it on with a machine washable marker.

I sewed them together kind of pillow case style and left a small opening to turn them right side out. All together there were four rectangles that made two sheets that I laid on top of each other and sewed down the middle. So there are four pages.....do I have you thoroughly confused yet? So the image below is one set of the rectangles and sewn down the middle to look like separate pages.


make sure if you decide to make one that you put on it somewhere your name and the date you made it. I had every intention of making one for each of my kids, but as everyone knows when you start having more kids, your time seems to disappear a lot quicker. :-)

Have fun crafting and keep checking back to see what else I pull out of my "archives".

Friday, February 17, 2012

Valentines Vase


I'm not sure where I got this idea from, but I usually see them somewhere or see an item and then think...."how can I make that, cheap?"

So I started at the thrift store and found a clear glass vase that I liked the shape of. I brought it home, washed it up and made sure it was dry inside and got out my craft paints.

I chose red, pink and white....I was also thinking how fun a glitter paint might be. Anyway, you might have to thin the paint a little because you want it to be able to run or travel well along the glass, but not so much that it's drippy. eww! You then put some drops together inside or next to each other to be more exact. Do this on a few of the sides and then start swirling it around until the the entire inside is covered with paint. Tip it in all directions if you like. It really makes a cool effect.
Now you can't really put water in this unless you spray some kind of sealer in it. It is water based craft paint and will wash away....not a good plan. I never sealed the inside of mine because I either just leave it like it is or put a fake Valentine's bouquet it in. :-)

I was thinking I may be posting another pic to go with this. I love the color turquoise or teal blue so I may try to do one that color or one to go with my living room colors....fun!!!

Don't forget there is a Michael's coupon at www.michaels.com. Just go to the weekly ad page.
There is a 50% off coupon going on right now.