Monday, December 10, 2012

Felt Sewn Snowman

On a snowy winter day....there is nothing better than sitting in a warm, cozy spot 
(for us it's in front of the fireplace) 
and working on a hand project.


All you need is some pieces of felt... cut out your pieces of snowman and
have them use the blanket stitch to sew them on. 
Draw on a face with sharpie or 
try your talents at sewing one on.

This is a fun projects for beginners or a pro.
You can then frame it or just hang it up somewhere.


Here are some great pictures to show you how to do the blanket
stitch if you're not familiar with it click on the link below


Friday, December 7, 2012

Tomato Cage Christmas Trees


My Friend Lori had one of these in her yard and I thought it was sooo clever and cute!  So I asked if I could use her idea and put one in my yard.....SHE SAID YES!!! Woo Hoo!   

My awesome neighbor loaned me the tomato cages and some of the lights.

(my night photography leaves a lot to be desired)


 You can use different sizes of tomato cages to give you the tree shape you want....starting with a big cage upside down and then just start stacking some smaller ones on top.  When you get to the top bend all the prongs in towards the center and put a bow on it.

String with lights and your all set.  You may want to secure the bottom with some kind of u shaped stake so that it doesn't tip over when it's windy.

Wednesday, December 5, 2012

Christmas Tree Craft


 I was getting my Christmas decorations out and ran across this cute little tree that my daughter made in our homeschool co-op....years ago...I love this little tree...and it is so easy and fun to do with kids.


First you'll need a 6" tall Styrofoam cone, a new spool of thread....
(cheap, dollar store kind)

Hot glue the spool of thread in the middle of the bottom of the cone...

make sure it stands up good...  


You'll also need a piece of green felt....or whatever color you chose.
Ours is glittery on the right side.
Your piece of felt need to be cut in a semi triangular shape....and from the point to the bottom it needs to be about 8 3/4" tall....

From side to side, from each bottom peak it is approx. 12" wide or a little more...to give you
some overlap.


You can decorate it anyway you like....but this is done by first hot gluing your ribbon on...(garland) which in this case is a measuring tape look....they were going with a sewing theme, can you tell?  :-)  Make sure you wrap it around the back side a little, so there are no raw edges showing...

Next you can sew buttons and beads on....or hot glue little applique things on.  Don't forget some kind of star or bow on top.

I would love to see a picture of yours if you make one....just send it to valsing65@gmail.com

I'm even getting inspired to make a white and blue one for my piano; to go with my snowman collection...or you could do a sports theme...

By the way...I haven't forgotten my snowman project...I'm on the hunt for socks...  :-)  My kids aren't little anymore, so I don't have the little colorful ones and I'm too cheap to buy them...

Friday, November 30, 2012

Snowman coming up...

Everybody gather your old socks for the next craft coming up....your husbands old white crews and your little ones colorful socks....I love this one!!

Socks, Buttons and black fabric paint or sharpies and some scraps of material

Sunday, November 25, 2012

Handmade Ornaments


 A Little Christmas Nostalgia


So, doesn't everybody want a little nostalgia at Christmas time.  I love looking at the the ornaments that either people have made or bought for me.  But the best ones of all are the ornaments that I have that I had from when I was a kid.  The one above was made out of a Jet Dry dishwasher detergent cup from the early 70's.  This just goes to show you that you can make an ornament out of just about anything.  All my brother had me do is wrap it in aluminum foil and put some metallic snowflake stickers on it.  Another one has a picture from an old Christmas card in it.
Sorry for the blur

So, this is another ornament that I made with my kids when they were smaller and it's a great way to keep them busy.  You could have them give them away to grandparents or aunts and uncles or maybe even have them decorate their own small tree.


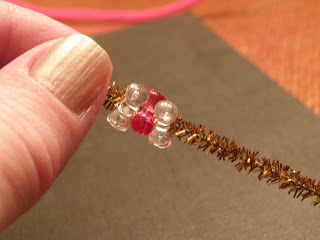
All you need is some pipe cleaners...White usually works the best but you can use whatever color
you want.  You also need some of these beads...they are called "tri-beads"  I use the transparent ones..I think they looks nicer and they nest together...All you do is have them thread them onto a pipe cleaner and then shape it into whatever shape you want.  Either a wreath or candy cane or whatever.


Be Creative and have fun!!  :-)


Monday, November 19, 2012

Dressed Up Air Freshener


Just a little something I thought of today. 


I decided to do this one instead for my bathroom...I really need to get more Christmasy paper... :-)


Saturday, November 17, 2012

Mr. Tom Turkey


This little gobbler was made by my daughter when she was about 9 or 10 years old.  

He has become one of my favorite Thanksgiving Decorations.

His body is made out of four sections.  Three tail piece sections and one body piece.

Each section needs two pieces of felt cut the same size that are sewn together leaving a small opening to stuff it and then finish sewing it up...it is a simple whip stitch with embroidery floss of a complimentary color.  

The back feather piece is 9 1/2 inches wide.  The middle feather section is 7 1/2 inches wide and the front section is 6 1/2 inches wide.  Also the front section does not get stuffed.

This next picture is to show you how they all line up when you hot glue the pieces together.

And just to give you an idea of what the shapes are....here are some examples on 81/2 x 11 paper.   
The first one is the back tail feather.
9 1/2 in. wide and 7 1/2 in high


Next is the middle piece. 
7 1/2 in. wide and 6 in high


And the front feather
6 in. wide and 3 inches. high


And lastly the body


you can free hand a little beak and wobbly thingy... and glue on some googly eyes and tie a little ribbon around his neck.  Give him some buttons for his front and you're all set.


Friday, November 16, 2012

getting back on track

well it has been a looonngg time and I'm sorry.

We decided to take a very much needed, but very last minute vacation to my hometown in New York State and we enjoyed our visit with the family we hadn't seen in many years.  Then as we were home and trying to get back into the old routine again...we had two very good friends pass away on the same day.  The last week has been spent going to visitations and funerals.

I have some ideas I want to share with you and will try to squeeze in before November is over with.

Hang in there...I'm trying to get back on track...I hope you have a lovely weekend...

Valerie


Thursday, October 11, 2012

Written Mugs

I love the idea of being able to create a custom made mug for myself or a friend....and now I have the bug to create special mugs for people....


 Start with your dollar store white mug or cup....wash and dry before starting.


next use a regular sharpie marker and start your design.

Then bake in a preheated 350 degree oven for 30 minutes.
Let cool and enjoy a nice cup of something warm in a
fun new mug...  :-)

Parts of Psalm 139 my favorite Bible verse

here are a couple of ours....


And I did put them in the dishwasher...top rack and so far so good...


Wednesday, October 10, 2012

Muffin Funny

My daughter was making those delicious muffins that I listed a week or so ago and she decided that she wanted to do them herself after only one time with my help....problem is....she forgot the baking powder.  

I always wondered what baking powder actually did and now I guess I know...without 
said baking powder, you get little muffins that are as hard as a rock and could be used as
a dangerous weapons.

So.....very important....don't forget the baking powder!!!

:-)


Thursday, October 4, 2012

Festive Fall Candle

I just bought a little votive cup at Goodwill for 50 cents...it was so pretty that it inspired me to try something similar.


So I bought my favorite "Glade" Apple/cinnamon candle.  I taped off the bottom half with tape to protect the glass.

Then you  spray the top half with spray adhesive and sprinkle with a festive color fall glitter.


I used three different colors of glitter and placed them sporadically around the glued section and overlapped them.


Remove the tape and then you are set to dazzle with a fantastic smelling candle, that's a bit
more special than it was when you first bought it...  :-)

You could even tie a little ribbon around it also to give it a little something extra.


enjoy and have fun!


Friday, September 28, 2012

Homemade Muffins

I know this is not "technically" a craft, but they were so yummy I had to share them.


Chocolate Chip Muffins

1 cup wheat flour
1 cup white flour
1/2 cup sugar
1 tbsp baking powder
1/2 tsp salt
1 egg
1 cup milk 
1/3 cup vegetable oil
3/4 cup chocolate chips
1 tsp vanilla

Directions

In a large bowl, combine the first four ingredients.  In a small bowl, beat egg, milk
and oil.  Stir into dry ingredients just until moistened.  Fold in chocolate chips.

Fill greased or paper-lined muffin cups three-fourths full.  Bake at 400 degrees for
18 - 20 minutes or until a toothpick comes out clean.     Yield - 1 dozen.


Blueberry Muffins

3/4 cup all purpose flour
3/4 cup wheat flour
3/4 cup sugar
1/2 tsp salt
2 tsp baking powder
1/3 cup vegetable oil
1 egg
1/2-3/4 cup of milk
1 cup fresh strawberries or thawed frozen blueberries


Topping

1/2 cup white sugar
1/3 cup flour
1/4 cup butter, cubed (not too cold)
1 1/2 tsp ground cinnamon

Directions

Preheat oven to 400 degrees, grease muffin papers or tins.

Combine 1 1/2 cups of flour, 3/4 cup sugar, salt and baking powder.  Place vegetable oil into a 1 cup measuring cup; add the egg and the 1/2 cup of milk.  Mix this with flour mixture.  Fold in blueberries.  Fill muffin cups right to the top, and sprinkle with crumb topping mixture.  

To make crumb topping: Mix together the 1/2 cup of sugar, 1/3 cup of flour, 1/4 cup cubed butter and 1 1/2 tsp cinnamon and mix with a fork until crumbly and sprinkle over muffins before you bake.

Bake for 20-25 min. at 400 until toothpick comes out clean. yield - 1 dozen


Good luck and happy eating :-) mmmm

Wednesday, September 26, 2012

Decorative Hook

I was at a store a couple of years ago and saw these nifty knobs that someone had made into like a hook that hangs on the wall....I wanted one in a bad way. I looked at the price they were charging and how much I didn't want to pay "said" price and decided that I could make it for much cheaper with my husbands help.  Some of you more handy ladies might be able to pull this off by yourselves.  let me just say, that the way he attached it to the wall....I don't know if it will ever come off. :-)


So we bought a piece of crown moulding...I actually think that it was a sample piece of crown moulding that was maybe $2 or something like that.  We then found a glass doorknob.  I think we bought ours new, but I know I've seen them at garage sales and antique shops.  

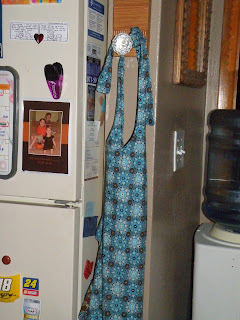
First you may need to stain the piece of moulding and put a picture hook or whatever you're going to use to attach it to the wall.  (I think what we used was a screw that screws into the wood and then "hubby" put an anchor in the wall and screwed it into the anchor).   You then attach the door knob to the moulding and hang it up....

I use mine to hang my aprons on. :-)


Monday, September 17, 2012

Fall Acorn Mirror

Well, sorry I have been away so long.

I have a fun craft that even the kids can get in on....

First take a nice walk under some oak trees and collect some acorn caps.  I love this part of the craft because I love taking walks in the fall and hearing the twigs and acorns crunch under my feet.  :-)
Try to get them close to the same size.

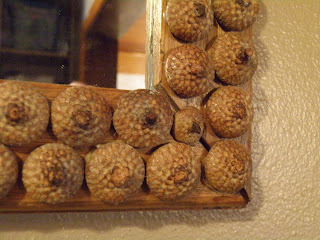
I went to a thrift store and found a nice size mirror with a flat, wide wooden frame (flat frame works the best)   and then start hot gluing the acorn caps onto the frame.  I did two rows, but you can do as many as fit around the edge of the mirror.  I would lay them out on the frame before you start gluing just to make sure you have them laid in a way that they are going to fit.


good luck and have fun on your walk  :-)

Thursday, August 23, 2012

Thursday, August 16, 2012

T-Shirt Quilt - Quilt As You Go

Well here is the promised video of the t-shirt quilt and the "quilt as you go" technique.

One thing I noticed is that my edges were not lined up well...make sure that they are even or even hanging off the end.  You can always trim them later and it is better to be too long than too short.


Even up all your edges before putting on the next row or bunch of layers.


also, after sewing each row on, make sure that you have sewn through all layers and that you don't have any holes that you won't be able to fix once you get the next row on...better to check first.  :-)

Wednesday, August 15, 2012

Video to come

I'm hopefully going to get a video on today of some of the steps I am using to do the t-shirt quilt.

Stay tuned ;-)


Tuesday, August 7, 2012

Felt Coasters

This idea actually started because of people leaving their McDonald's cups and other glasses on my dinning room table and I had marks all over because of the condensation  coming off the cup and puddling up on my table....Not Good!!!

So, I decided to give my daughter a task of making some coasters.  

(as you can see she is not quite finished with all of them yet...)

Years ago my oldest daughter had made some trivets using felt and layering them...(circles).  I decided to pick up where she left off and try to make coasters the same way.

I told my daughter the shape I wanted her to use and we picked out the color pallet that we were going to go with....my idea was "oceany" kind of colors.

She made a pattern out of cardstock.  They are 5", 4", 3" &  2" squares.

And then choosing what colors she wanted to go together and cutting the sizes accordingly.

Start by sewing the 4" square to the 5" and then keep stacking them.  
.

(Below is our dog....)
They were sewn together using a large running stitch around them.  If you wanted to use a matching color to each piece of felt, you could do that, so that your stitches wouldn't be seen.


As you'll notice they are all the same colors, but not put in the same order.

A little designs was put in the middle of each one.  
These were done free hand.

She sewed the little details on, but I think you could also glue them on 
with Aileen's tacky glue

(I was also trying to figure out how to put a piece of cork on the bottom just to give some extra "insurance" that it wouldn't get water on the table.but I'm hopeful that all the layers of felt with stop the drips.)

So I thank my Amy girl for doing these for me and hopefully I won't have white water marks on my table anymore.  :-)