Showing posts with label easy. Show all posts

Sunday, November 3, 2013

Disappearing 9 Patch

Fundraiser Quilt

There is a young boy in our family 
who has been fighting testicular cancer.
They are having a fundraiser for him and his
family this month, for the medical bills.

I wanted to help out, so I decided to start yet
another quilt....but Praise God, this
one got finished pretty much on time.

The Benefit is on Nov. 17th if anyone in
my area is interested in knowing more, just
email me.


This is a disappearing nine patch done with 
all batiks....I love it!   


most of the fabric was purchased at

I stitched in the ditch around all squares and rectangles and then stippled only 
in the purple squares

If there is someone who doesn't know what a disappearing nine patch is....I'd love to know...so I can show you how easy it is...
leave a comment below.  

Thursday, October 4, 2012

Festive Fall Candle

I just bought a little votive cup at Goodwill for 50 cents...it was so pretty that it inspired me to try something similar.


So I bought my favorite "Glade" Apple/cinnamon candle.  I taped off the bottom half with tape to protect the glass.

Then you  spray the top half with spray adhesive and sprinkle with a festive color fall glitter.


I used three different colors of glitter and placed them sporadically around the glued section and overlapped them.


Remove the tape and then you are set to dazzle with a fantastic smelling candle, that's a bit
more special than it was when you first bought it...  :-)

You could even tie a little ribbon around it also to give it a little something extra.


enjoy and have fun!


Tuesday, August 7, 2012

Felt Coasters

This idea actually started because of people leaving their McDonald's cups and other glasses on my dinning room table and I had marks all over because of the condensation  coming off the cup and puddling up on my table....Not Good!!!

So, I decided to give my daughter a task of making some coasters.  

(as you can see she is not quite finished with all of them yet...)

Years ago my oldest daughter had made some trivets using felt and layering them...(circles).  I decided to pick up where she left off and try to make coasters the same way.

I told my daughter the shape I wanted her to use and we picked out the color pallet that we were going to go with....my idea was "oceany" kind of colors.

She made a pattern out of cardstock.  They are 5", 4", 3" &  2" squares.

And then choosing what colors she wanted to go together and cutting the sizes accordingly.

Start by sewing the 4" square to the 5" and then keep stacking them.  
.

(Below is our dog....)
They were sewn together using a large running stitch around them.  If you wanted to use a matching color to each piece of felt, you could do that, so that your stitches wouldn't be seen.


As you'll notice they are all the same colors, but not put in the same order.

A little designs was put in the middle of each one.  
These were done free hand.

She sewed the little details on, but I think you could also glue them on 
with Aileen's tacky glue

(I was also trying to figure out how to put a piece of cork on the bottom just to give some extra "insurance" that it wouldn't get water on the table.but I'm hopeful that all the layers of felt with stop the drips.)

So I thank my Amy girl for doing these for me and hopefully I won't have white water marks on my table anymore.  :-)


Monday, July 16, 2012

Porcupine Garden Pal

Sorry for the hiatus, but sickness was in the house...  :-(

So now back to crafting...

I saw this cute little guy in a magazine and thought he would be an oh so cute addition to my garden.  Anything has to be better than the drought ridden, dying flowers.  :-(


So you start with a larger rock...like maybe 6 or 7 inches long.


I started with the face.  figure out which end would make a good face end. and start by drawing your face with a sharpie.  Then I painted it with craft paint.


Next start by hot gluing your pine needle clumps to the back and then just keep working your way forward.  I saved all the ones that were kind of curled up for the front.

Get some small pine cones or break some in half to be the right size for the ears.


If you started with a clean rock (which I didn't) you could keep it in the house....if you don't have allergies (which I do)....so mine is in the garden.
:-)  

Happy Crafting!!!

Saturday, June 23, 2012

Bridal Bouquet and Boutonniere


Well, I have made my very first attempt at making a Bridal Bouquet and Boutonniere for a friends wedding tomorrow...I watched some youtube videos for help and am very pleased with the results...I only wish I would have been thinking in time to make a video of my own.  But the pictures will have to speak for themselves.

A couple of pointers that were very helpful were, one..to start with four flowers.  One for the center...probably the one that is the most open and then 3 surrounding it.  Once you have them where you want them use your floral tape to make them stay in place and then you can start building around that.  Once you have all your flowers where you want them go ahead and tape the whole stem...enough for a nice handle.  After you've wrapped it with floral tape then cover with white ribbon all the way down and back up and then secure at the top with a pin.

Leave enough of the stem that you can store them in a vase of water in the frig. if it has to be overnight, like mine do.


Right before the wedding I will cut the stems so they are just below the ribbon.


I did do a video of the boutonniere, but we'll see if that makes it on next week...it was made in a bit of a hurry....I was getting tired.


It was really fun....so give it a try.  Now I'm praying that they make it until tomorrow afternoon.

Monday, May 21, 2012

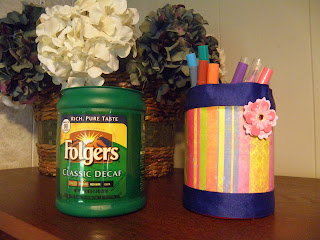
Marker Holder

From This..... 


To This.....


I love easy projects that take something you might throw away and  instead....re-purpose it....

I just took my 11.3 oz plastic coffee container and wrapped some scrapbook paper around it and ribbon at the top and bottom and added a little embellishment and Voila' you have a new pencil/marker holder.  You can be as extravagant or simple as you choose.  I love that it's just the right height for these markers....
You could also use contact paper if you'd like....but I don't get along with contact paper so good... lol.


Wednesday, May 9, 2012

Lunch Bag Scrapbook


 This is a fun craft to do with your kids and they really have a good time doing it.  Some other options for boys could be pictures of bugs that they think are interesting or their favorite sports players.


Do an album for a friend of pictures of them or leave bland spots for them to insert their own pics.


What's your hobby?  Make an album of that.  Whatever it ends up being....Have fun!

Thursday, March 8, 2012

Magnetic Picture Holder

Check out this new magnetic picture page for the refrigerator. Not bad for free...all stuff I had around the house. If you don't want to spend the money on a self adhesive magnetic sheet, just use old advertising magnets and glue them on the back. You may even know someone that could spare a page protector so you wouldn't have to buy those. The embossed metal accents you see are just foil stickers from the dollar store they came all connected. I cut them apart to make four "stamps". I wanted to keep it simple since I have a lot going on up on the fridge as it is. :-)


Friday, February 17, 2012

Valentines Vase


I'm not sure where I got this idea from, but I usually see them somewhere or see an item and then think...."how can I make that, cheap?"

So I started at the thrift store and found a clear glass vase that I liked the shape of. I brought it home, washed it up and made sure it was dry inside and got out my craft paints.

I chose red, pink and white....I was also thinking how fun a glitter paint might be. Anyway, you might have to thin the paint a little because you want it to be able to run or travel well along the glass, but not so much that it's drippy. eww! You then put some drops together inside or next to each other to be more exact. Do this on a few of the sides and then start swirling it around until the the entire inside is covered with paint. Tip it in all directions if you like. It really makes a cool effect.
Now you can't really put water in this unless you spray some kind of sealer in it. It is water based craft paint and will wash away....not a good plan. I never sealed the inside of mine because I either just leave it like it is or put a fake Valentine's bouquet it in. :-)

I was thinking I may be posting another pic to go with this. I love the color turquoise or teal blue so I may try to do one that color or one to go with my living room colors....fun!!!

Don't forget there is a Michael's coupon at www.michaels.com. Just go to the weekly ad page.
There is a 50% off coupon going on right now.