Monday, December 10, 2012

Felt Sewn Snowman

On a snowy winter day....there is nothing better than sitting in a warm, cozy spot 
(for us it's in front of the fireplace) 
and working on a hand project.


All you need is some pieces of felt... cut out your pieces of snowman and
have them use the blanket stitch to sew them on. 
Draw on a face with sharpie or 
try your talents at sewing one on.

This is a fun projects for beginners or a pro.
You can then frame it or just hang it up somewhere.


Here are some great pictures to show you how to do the blanket
stitch if you're not familiar with it click on the link below


Friday, December 7, 2012

Tomato Cage Christmas Trees


My Friend Lori had one of these in her yard and I thought it was sooo clever and cute!  So I asked if I could use her idea and put one in my yard.....SHE SAID YES!!! Woo Hoo!   

My awesome neighbor loaned me the tomato cages and some of the lights.

(my night photography leaves a lot to be desired)


 You can use different sizes of tomato cages to give you the tree shape you want....starting with a big cage upside down and then just start stacking some smaller ones on top.  When you get to the top bend all the prongs in towards the center and put a bow on it.

String with lights and your all set.  You may want to secure the bottom with some kind of u shaped stake so that it doesn't tip over when it's windy.

Wednesday, December 5, 2012

Christmas Tree Craft


 I was getting my Christmas decorations out and ran across this cute little tree that my daughter made in our homeschool co-op....years ago...I love this little tree...and it is so easy and fun to do with kids.


First you'll need a 6" tall Styrofoam cone, a new spool of thread....
(cheap, dollar store kind)

Hot glue the spool of thread in the middle of the bottom of the cone...

make sure it stands up good...  


You'll also need a piece of green felt....or whatever color you chose.
Ours is glittery on the right side.
Your piece of felt need to be cut in a semi triangular shape....and from the point to the bottom it needs to be about 8 3/4" tall....

From side to side, from each bottom peak it is approx. 12" wide or a little more...to give you
some overlap.


You can decorate it anyway you like....but this is done by first hot gluing your ribbon on...(garland) which in this case is a measuring tape look....they were going with a sewing theme, can you tell?  :-)  Make sure you wrap it around the back side a little, so there are no raw edges showing...

Next you can sew buttons and beads on....or hot glue little applique things on.  Don't forget some kind of star or bow on top.

I would love to see a picture of yours if you make one....just send it to valsing65@gmail.com

I'm even getting inspired to make a white and blue one for my piano; to go with my snowman collection...or you could do a sports theme...

By the way...I haven't forgotten my snowman project...I'm on the hunt for socks...  :-)  My kids aren't little anymore, so I don't have the little colorful ones and I'm too cheap to buy them...

Friday, November 30, 2012

Snowman coming up...

Everybody gather your old socks for the next craft coming up....your husbands old white crews and your little ones colorful socks....I love this one!!

Socks, Buttons and black fabric paint or sharpies and some scraps of material

Sunday, November 25, 2012

Handmade Ornaments


 A Little Christmas Nostalgia


So, doesn't everybody want a little nostalgia at Christmas time.  I love looking at the the ornaments that either people have made or bought for me.  But the best ones of all are the ornaments that I have that I had from when I was a kid.  The one above was made out of a Jet Dry dishwasher detergent cup from the early 70's.  This just goes to show you that you can make an ornament out of just about anything.  All my brother had me do is wrap it in aluminum foil and put some metallic snowflake stickers on it.  Another one has a picture from an old Christmas card in it.
Sorry for the blur

So, this is another ornament that I made with my kids when they were smaller and it's a great way to keep them busy.  You could have them give them away to grandparents or aunts and uncles or maybe even have them decorate their own small tree.


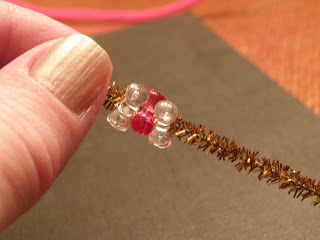
All you need is some pipe cleaners...White usually works the best but you can use whatever color
you want.  You also need some of these beads...they are called "tri-beads"  I use the transparent ones..I think they looks nicer and they nest together...All you do is have them thread them onto a pipe cleaner and then shape it into whatever shape you want.  Either a wreath or candy cane or whatever.


Be Creative and have fun!!  :-)


Monday, November 19, 2012

Dressed Up Air Freshener


Just a little something I thought of today. 


I decided to do this one instead for my bathroom...I really need to get more Christmasy paper... :-)


Saturday, November 17, 2012

Mr. Tom Turkey


This little gobbler was made by my daughter when she was about 9 or 10 years old.  

He has become one of my favorite Thanksgiving Decorations.

His body is made out of four sections.  Three tail piece sections and one body piece.

Each section needs two pieces of felt cut the same size that are sewn together leaving a small opening to stuff it and then finish sewing it up...it is a simple whip stitch with embroidery floss of a complimentary color.  

The back feather piece is 9 1/2 inches wide.  The middle feather section is 7 1/2 inches wide and the front section is 6 1/2 inches wide.  Also the front section does not get stuffed.

This next picture is to show you how they all line up when you hot glue the pieces together.

And just to give you an idea of what the shapes are....here are some examples on 81/2 x 11 paper.   
The first one is the back tail feather.
9 1/2 in. wide and 7 1/2 in high


Next is the middle piece. 
7 1/2 in. wide and 6 in high


And the front feather
6 in. wide and 3 inches. high


And lastly the body


you can free hand a little beak and wobbly thingy... and glue on some googly eyes and tie a little ribbon around his neck.  Give him some buttons for his front and you're all set.